|
Configuring the Receiver Options
This step show you how to configure the Receiver to receive
HL7 message and send standard HL7 acknowledgement message
back to the HIS or clinical system. To configure the Receiver
options do the following
- From the receiver window, click on the Options icon
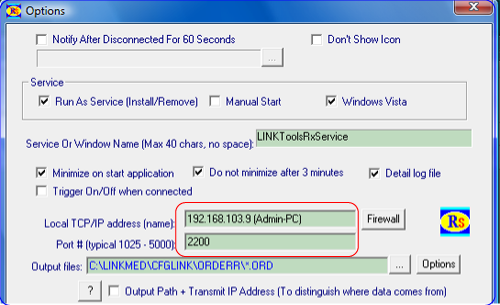
The Receiver configuration Options screen appears
- Check the Minimize on start application allows the Receiver
to dock to Windows® Task tray on startup (default)
- Check the "Do not minimize after 3 minutes"
check box allows the Receiver window to stay open for viewing
messages received on screen
- Check the Detail log file check box allows the Receiver
to create detail transactions log of the interface
- The Trigger On/Off when connected is used only in legacy
system interface to keep connection
- Enter the IP address of the server where the Receiver
is installed in the Local TCP/IP address (name) column
- Enter the port numbers in the Port # column (default
to 2200)
- Leave the Output files directory at default setting
- Leave the Protocols setting at default setting (HL7 MLLP
format 2)
- Configure the Receiver to validate HL7 message and send
HL7 acknowledgements in the Receiver ACK column by clicking
on the down arrow in the ACK column and select Validate
HL7 Message from the list
- Click on the Options button to the right of the Receiver
ACK column and select Not Applicable from the Processing
ID list
- Verify the TCP/IP client connection(s) on the Receiver
"Info" column
- Verify The Receiver receives HL7 messages and sends proper
HL7 acknowledgements
- Configure the Receiver to run as service from the Receiver
Options window by check the "Run As Services (Install/Remove)"
check box
Next>>>

LINKMED® HL7 TCP/IP Receiver Options Configuration window
|


 ©
Copyright LINK Medical Computing, Inc. All rights reserved
Terms of Use.